Aruba wants you to stop buying the AP134-135. 3rd times the charm?

Earlier this month, Scott Calzia, Director, Product Marketing at Aruba posted an article deriding the announcement of an 802.11ac module from Cisco for their flagship Access Point – the 3602. I took umbrage at the article which lead to the following posts and replies between myself and Aruba Product Marketing Manager, Ozer at Aruba: My first postOzers replyMy next replyHis next reply, and now this post.

Before going any further, I certainly acknowledge that this threaded saga of post-reply-post-reply is a difficult one to follow and I believe that further discussion will likely take place on the No Strings Attached Show. There is a good deal of technical discussion and rabbit trailing in the threads between Oz and myself and I some of them are quite tangential but I’m trying to keep topics centered around the original post topics. I welcome further discussion about performance & feature sets that are outside of the original post and if you’d like to have something addressed in further detail, please leave me a comment in the section below! Having said that, it’s hard to thank someone of Ozers caliber for continuing to stay engaged without sounding trite or insincere. I (and many of my readers that prefer offline comments) genuinely appreciate the dialogue and open discussion. Keeping each other honest with an above board, fun and engaging conversation is exactly the point of this.

Onto the meat!

Alright I am back for round 2… I hope this does not last until round 15 :) I gotta tell you I love the “ding-ding” opening! I am glad that we can keep the discussion fun, engaging instead of using anger and personal attacks… Thanks again for accepting my reply, glad to have the discussion going. BTW, you type fast!

Your comment to Aruba blog…
I am assuming it is a side effect of web changes yesterday (new navigation and converging 3 blog pages into 1) but I will check shortly.

Sounds good! It looks like my original post is still ‘awaiting moderation’ but I look forward to having it approved – Mine get auto-approved, pending spam filtration so I’d be interested in hearing from Scott as well!

Regarding 2400…
small typo as you can guess: meant to refer to 2500 series controllers.

Well, that’s what I was thinking Scott meant in his first post. This means that the corrected statement would be (in reference to controllers that support the 3600):

So if you have older 2500, 4000, WiSM or WCS, it is that time to write your Cisco tax check again.

Sadly, this statement is also false since the 2500 WLC does indeed support the 3600. As a side note, the WCS release notes call out support for the 3600 as well. I’ve been asking for some time about clarification of code support for the controllers and how that meshes with the WCS/3600 support, but it does state it and I presume that since WCS supports code release 7.1, Cisco can claim 3600 support. Yes this is slightly ambiguous and not 100% clear but as the Aruba statement sits, it’s incorrect. Cisco isn’t perfect (there, I said it) but, at minimum, checking the release notes is a) easy to do since they don’t change locations and b) should be a requirement before declaring something is incompatible.

Alright back to tech…

Regarding 1250 series AP (since many commented on it)…
Almost a year after 1250 series, 1140 series was announced. I am not claiming that the AP actually physically failed (it obviously worked just fine after you managed to install it) – it was no longer the right AP to install for many, unless you are installing APs in a warehouse or similar challenging environments. Cisco’s promise of “modular AP is the way to go” was no longer. 1140 had better form factor, better price, did not need external antennas, better PoE efficiency. There was almost no reason to install 1250 series in a classroom or a carpeted office space after 1140 series was released. During that timeframe Aruba’s AP-124/125 series won many deals against Cisco 1250 series (support for PoE and better form-factor were big technical reasons) when we get the chance to sit at the table. Market demanded something better than 1250 series.

Well, I don’t think Cisco ever declared that ‘modular was the way to go (forever and ever)’. We all know that manufacturing efficiencies can be achieved with highly integrated component and if you’ll recall, the IEEE ratified the 802.11n spec during that first year – that’s the reason the 1142 came out in short order. The 1252 was a modular goto-market product that addressed a specific need and was very successful at it. Don’t get caught comparing Apples to Oranges here though, the 1252 and the 1142 are not positioned as competitors and the 1252 was still positioned as the de-facto 802.11n Access Point for external antenna support and extended operating ranges well after the 1142 was launched (as you rightly stated). The 1262 is the Access Point that ultimately replaced the 1252, not the 1142. If you needed an Access Point with flexible antenna options that operated in an environment up to 131F, the 1252 was your man. Admittedly, you may not have been at the table for deployments like that since Aruba doesn’t play well in extreme environments (over 122F for the Aruba 120/130), but I was and I continued to sell the 1252 in significant quantities well past the launch of the 1142. I didn’t realize that defending the 1252 was going to be such a popular topic! I suppose it’s easy to mis-construe the past to those that didn’t live it first-hand, but there you have it.

Of course, there is a trend with Cisco’s modular APs – great marketing for Cisco, brings in more dollars. I am just not convinced that it is the right thing for the customer. My humble opinion…

And you’re close to the point here. Yes, it’s good marketing, but it also fills a need (not just Ciscos coffers). It’s easy to beat up on the dog in front declaring missteps or some other ‘lack of vision’ as a defensive strategy, but the 801.11ac module fills a need that we’re seeing more and more in RFP responses and as a growing concern among enterprises. It’s investment protection and people want this today.

Let’s double click on Cisco’s investment protection….

Note that 1st gen 11ac AP does not go above 3 spatial streams (instead of up to 8 defined per 11ac standard) and does not support multi-user MIMO (which is really beneficial for the upcoming 11ac capable smartphones and tablets as you know). My guess is 2nd gen 11ac APs will have up to max of 5 spatial stream support… since putting 8 antennas in an AP may not be that great of an idea since folks want APs that can be carried by hand… alright let’s go through couple of investment scenarios.

Case#1: Case#2: Case#3: Case#4:

(Note: actual cases omitted for brevities sake, but are available in blog post comments here.) There are indeed numerous ways to slice and dice situations to the benefit (or not) of a particular manufacturer. The 802.11ac module is not intended to be the only 802.11ac Access Point Cisco will ever offer (obviously), nor is it intended to address 100% of each and every purchase requirements for every customer. It’s modularity is intended to bridge the gap to a new technology which is why it was developed in the first place. Will it fit every customer? No. Are there customers today that want to make sure they have a low-cost way to move to 3SS 802.11n and upgrade to 802.11ac in the future? Yes. Scott seems to miss this point in his blog post. Aruba does not have a public facing 802.11ac option so it’s only natural that they’re defensive.

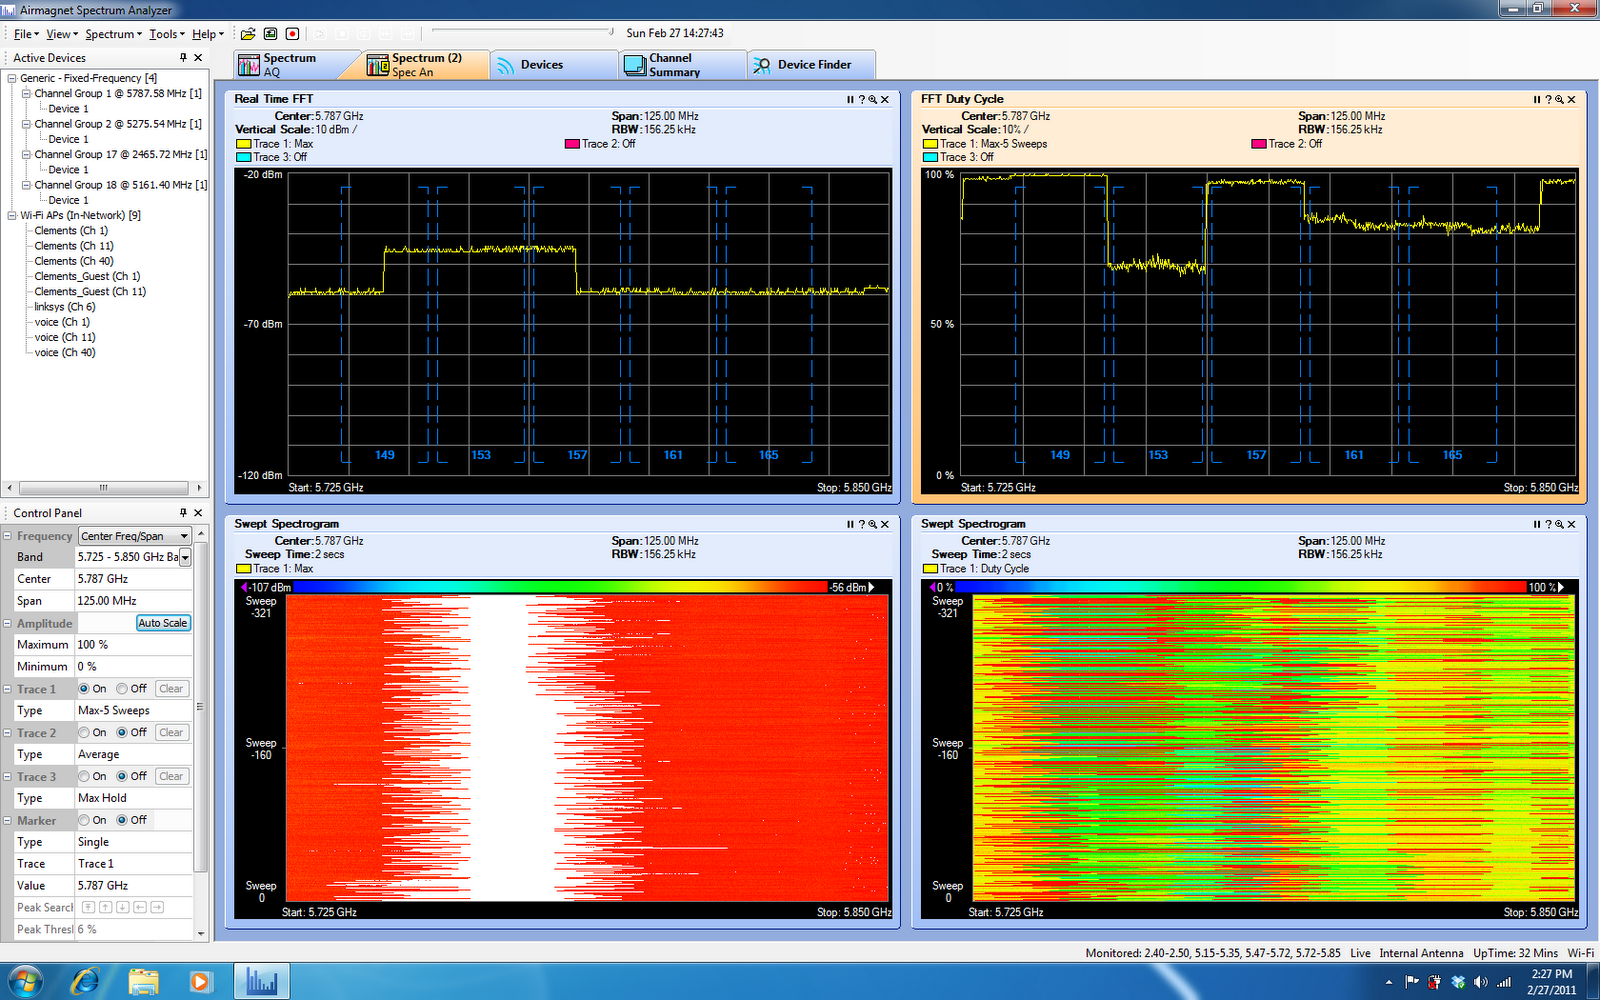
Having said that, there is a portion of your Cases that I’d like to address (and maybe move to another blog post-conversation-thread). ‘Spectrum Analysis’: Noise awareness has been available and considered in RRM calculations for a long time now but Cisco made the decision to develop the best available spectrum analysis capabilities into their solution. ‘Spectrum Analyzers’ that are coarse noise-floor analysis are less accurate and in Arubas case, require additional licenses. Are the licenses expensive? Not in small quantities, but ask any Aruba customer and they’ll complain about feature set licenses. That’s two things that Cisco does better than anyone – no featurset licenses and the best available spectrum analysis. Can you compromise on those features in your enterprise? Perhaps – that’s for you to know. Can I compromise on those features in my enterprise? No. I need the best and when I go hunting for an X-box controller, finding out that it was a transient bluetooth device after 3 hours of looking is unacceptable. This is the reason that Cisco differentiates this feature in it’s Access Points. Implementing ‘Spectrum Analysis’ without a discreet analyzer is less accurate. Cisco won’t put their name on that for a reason. In her article, Joanie Wexler, Network World, claims, “Indeed, Aruba product manager Peter Lane acknowledged about a 5% throughput drop in cases “where you’re maxing out the throughput of the APs already.” Aerohive’s Matt Gast, director of product management, estimated the performance hit as closer to 30%; however, he recommends turning it on only when there’s a problem.

Ok I think I just got the cross-eye that Scott was talking about in his blog… without having to use the OptiGrab! So investment protection argument by Cisco applies to the last case listed above. My educated guess is we will see more of #1, #2, #3 than #4. Again that’s my opinion… agree to disagree.

I suspect we’re heading down the ‘agree to disagree’ path, but the fact remains, in the market today I have customers that have a vision. Their vision is to support tomorrows technology leveraging todays investments. The only manufacturer that has a solution is Cisco and Cisco is going to advertise the heck out of that since it’s a clear competitive differentiator. They’re going to take heat for it, they’re going to get beat up, they’re going to have it mis-represented to the needs of other manufacturers, but Cisco took a leap that no-one else did. Will Cisco sell modules? Yes. Will they be the only way to get 802.11ac? No. There will always be bigger and better on the horizon? Yes. Those that do proper lifecycle management of their infrastructure can leverage this product to future-proof their investment.

FCC link and conversation omitted because:

This is an interesting point and since I work for a Cisco partner under NDA, I can’t discuss this until products ship and are publicly announced. I hope you understand. 🙂

Aruba performance tests…
We do not have Android tablets to replace iPads – no reason to – we have 100+ iPads in the TME labs.

As may be the case, but there is a huge discrepancy in your ‘internal tests’:

You claim to be file transfers to iPads, but don’t list them in your ‘Clients used for testing’. (continued below)

No change in video resolution for Aruba WLAN compared to Cisco WLAN

Aruba uses Active Transcoding in their tests. Cisco does not. This has the net effect of reducing the resolution of the stream for every client and is a mis-representation of the Aruba test. Cisco tackled this head on using the full resolution streams and shined. Aruba changed the parameters and represented it as the same tests. (continued below)

– it is the same exact infrastructure, testbed. Again no reason to. Enabling and disabling RF scanning, IDS, spectrum/CleanAir does not make any difference for either vendors.

I’d love to tackle this first hand. In the interest of full-disclosure, I have an AP-135 and attempted to enable spectrum analysis, but was unable to since at the time it wasn’t supported in ‘Instant’ configuration. I look forward to seeing this development come to market unless of course you want to get me an Aruba 200 controller (and licenses) to play with. 🙂 If it doesn’t impact the performance of the tests, turn them on and prove it to us (continued below)!

Aruba TMEs ran those tests for weeks. We should talk about “maximizing airtime” in another opportunity – Aruba’s RF engineering focuses on this topic nowadays than ever. For instance, a test for you to consider running on Cisco WLAN… start with 5 smartphones on 11n 2.4GHz radio. Record TCP download throughput. Repeat with 10, 15, 20 smartphones. Then add TCP upload traffic into the mix and record total throughput. Results are interesting.

Would love to discuss this more, but as you pointed out, we should tackle that in a separate thread – this is getting long winded as it is! 🙂

Miercom = independent… really? Cisco TMEs run these tests in their labs, publish it on the website URL that you shared and it just happens that a separate set of engineers who work for Miercom happened to run the same set of tests – not less or more – and come up with exactly the same set of test results. Independently. Without being paid any consulting fees by Cisco. Really? :) I firmly believe that something like Network World Clear Choice test reports are independent – and I cannot see how Miercom follows the same model.

(this is the continuation you were looking for) The reason I suggest a Miercom report instead of publishing ‘internal Aruha test results’ is that Arubas tests seem fraught with inconsistencies and, in my book, this calls into question the validity of their test process and results. Put another way, how can we be sure your data is accurate if you’re testing iPads without listing them as clients and pulling shady transcoding  shenanigans, calling it the same as full-resolution media streams. Is that an extreme opinion? Perhaps, but independent reporting should clean up those rough edges and level the playing field.

NSA podcast show is a great idea! Let’s do it. I will email Blake.

ps. Happy to chat about ISRs and ISE more down the road!

Deal on both fronts! Looking forward to visiting Aruba during Wireless Tech Field Day 3!

-Sam

Post Script:

Several folks have either outright asked offline or insinuated a handful of statements about this thread which I’d like to address:

You’re just flanning the flames for readership to make money. I do not monitize my blog with ads. I do not make revenue from it in any way shape or form and pay for it out of my own pocket.

You’re being spoon-fed responses by Cisco. I am not. My blog is mine and mine alone. My thoughts are my own and (with the exception below) are not generated by anyone else. If I get data from other sources, I will do my best to list those sources clearly.

You work for a Cisco reseller and have ‘the inside scoop’ which sways your opinions. Well, yes. I do indeed work for one of the largest Cisco resellers in the US. This does give me insight and access to hardware that others may not have and since it does, I do consider myself ‘up on the solution’. My employer does not endorse or influence my blog with the exception of discussing NDA information. I am bound by my employer to not discuss NDA information outside of the scope of the agreement and I continue to abide by that.

Aruba wants you to stop buying the AP-134 and AP-135. Offers no alternative.

Every once and a while, I stumble across articles that make no sense, are poorly worded or constructed, or flat out wrong. Last week, I ran across one such article that was so out of left field that I felt compelled to address it directly here in my own words. The article is over on the Aruba Networks official blog site (presuming it’s still up). Take a moment, head on over and give it a read (article preserved here for posterity). I was so flabbergasted by the article and its combination of FUD and flat out incorrect information that I used the ‘leave a comment’ link on the bottom. Once I did that, it dawned on me that my comments would likely never get posted – I then realized that I have my own forum to respond to this in, so the next portion of this blog post is the comments I left (with a few typographical and edits to make it flow):

Begin reply post

Wow – there is so much FUD in this article, it’s laughable.

Regarding the 1252 comment:

Remember the Cisco 1250 access point? This pre-standard AP offered future-proofing with an upgradable 802.11n radio meeting the ratified standard. It didn’t work out as it was costly and difficult to upgrade, and didn’t meet the promised performance benefits. 

This is flat out untrue. It ‘didn’t work out’ because it didn’t *need* to work out. The 802.11n pre standard was rolled into the final 802.11n spec. This (upgradability) was only there to ensure users that, in the event the specification was not implementable in the 1252 hardware, that they had an option to field upgrade the units. The performance was on par with other first generation 802.11n products and the 1252 was the wifi alliance test bed for compatibility – it was basically *the* reference 802.11n platform for a very long time.

Difficult to deploy: The 3600 11ac module must plug into the base of the access point, exactly where the mounting brackets are located. This means users will need to remove a deployed AP from operation. This is not a simple plug-in but more akin to opening your laptop for a RAM upgrade. 

Have you actually *seen* the 802.11ac module or a 3600? There is a piece of tape on the back of the AP and two thumb screws. This is more like replacing the battery in your laptop instead of opening it up for a RAM upgrade. This upgrade also will not compromise the thermal venting that is required in lesser manufactures Access Points since the main unit remains sealed.

Lack of promised performance: The IEEE 802.11ac standard promises increased performance over 11n technologies, but the 3600 11ac module’s throughput is dependent on its two-year old processor and RAM, which only scales to 11n rates. This means that although you will be able to connect with newer 11ac clients, there will be questionable increase in performance by doing so. Why spend money for increased performance when you won’t notice it? 

Really? You’ve done performance testing to empirically validate your claims? No? I didn’t think so. Cisco knew well in advance that 802.11ac was coming and the CPU and memory in the 3600 is significantly greater than in the 3500 – specifically for this reason. Until you can show us numbers to back up your vapor-stats you have no evidence that the CPU/memory subsystems of the AP will hinder its performance.

Constrained RF: The 3600 11ac module has its own antennas, and since Wi-Fi rates depend a great deal on antenna design, shoe-horning antennas into the small space of the module will yield less than optimal performance to clients. The result will be your 11ac clients will connect to stronger RF signals from 11n radios. 

Have you discussed the RF design characteristics of this module? Do you know how it will integrate with, instead of replace or work against, the (integrated) 802.11n radio? You assume this will be a discreet radio operating independently of the 802.11n radio. Don’t assume – know. Once you can declare the design is somehow faulty and back it up with block diagrams from Cisco on how the module will (or won’t) interoperate with the host AP, you’re basically guessing and spreading FUD.

Inconsistent feature set: The 3600 11ac module will use a new, untried chipset that may be incompatible with existing Cisco WLAN controller code. So if you add the 11ac module, you have the same hardware, but different features. That will lead to a management challenges and increased operational expense. 

The mindset of ‘don’t move because it’s a new chipset’ or ‘it may require new code’ is a completely invalid conversation. When Aruba releases its 802.11ac AP don’t you expect it to be a) a new chipset or b) to require new code? This is going to happen for every infrastructure manufacturer – Aruba included.

More upgrades coming: The 3600 AP itself requires you have the latest 5500 series or WiSM2 controllers as well as NCS management. So if you have older 2400, 4000, WiSM or WCS, it is that time to write your Cisco tax check again. Make it out to, “Cisco Catalog of Compromise”. And consider this- the 3600 11ac module is pre- standard and will not meet promised performance increases, so you will likely be replacing those 3600 APs at some point in the near future. 

You position the requirements for the 3600 as having a very narrow list of supported controllers (which is misleading) – it is also supported on the 7500 controller, the 2504 controller and the SRE controller. Are you telling me that every modern Aruba AP is supported on every past Aruba controller? At some point you have to lifecycle manage your gear – even Aruba. I don’t even know what a 2400 is.

All told, the expectation of having a Cisco 3600 AP + module will a) give you better performance today with 3 spatial streams and the cost of the module plus the 3600 will be far less expensive than purchasing an Aruba 3 SS AP today and replacing it with an Aruba 802.11ac AP tomorrow. There is no upgrade assurance with the Aruba. The message is loud and clear – if you’re an Aruba customer, do *not* purchase the AP-135. You will end up needing to forklift it out when you move to 802.11ac next year. Buy a Cisco 3600 + 802.11ac module and you’ll have spent far less money than buying two Aruba Access Points (1 now, 1 later).

-Sam

End reply post

Now, I realize it’s laughable to infer that Aruba is advocating you not purchasing their flagship Access Points and it’s a leap assume that since Aruba has no upgrade investment protection that this means that you should stick with your old Aruba equipment, but this leap is a small step – more akin to jumping off of the bottom step of your stairs to the ground floor. The leaps that Aruba makes regarding 802.11ac and the module from Cisco are more akin to Arubas entire executive team finding the tallest building in San Jose and jumping off it all the while waving their fists in the general direction of Tasman Drive. Shame on Aruba for not fact checking their article. Shame on Aruba for spreading FUD. Shame on Aruba for picking a fight with baseless facts and accusations – declaring facts about a product that they’ve not even laid hands on.

-Sam

Filtrete WiFi Thermostat

Much to my wifes chagrin, I recently purchased yet another thermostat for the home. Our house came with a pretty standard analog style thermostat originally, and after wanting something a tad more ‘tech friendly’, I previously opted for a Home Depot purchased Honeywell touch screen unit. This worked well, but when I discovered the WiFi enabled thermostat from 3M Filtrete, I had to replace it. This was my second foray into thermostat work for the home so I was feeling pretty confident overall in my ability to replace my home unit for the second time.

Please note that I am not an electrician and if you do electrical work incorrectly or disregard any packaging warnings or instructions, you can seriously damage your home HVAC equipment, generally cause electrical home mayhem including tripping circuit breakers and blowing fuses, or cause bodily harm – including death. Do not attempt this unless you’re a savvy electrical type of person and always follow the included safety advice of the product. I recommend you starting this project early in day. In the event you screw something up, you want a window of time during the day that an electrician can help you out!

Now that’s out of the way, you could understand my interest in tying my thermostat into my home wireless network. 1) it’s cool (no pun intended) and 2) think of the possibilities! As it turns out, 3M Filtrete have a relationship with the folks over at RADIO THERMOSTAT to provide the cloud based services to control your home climate from any Internet enabled device – including your phone! After a quick check of the wireless device capabilities and a confirmation that it does indeed support WPA2/AES encryption (albeit PSK only), it was a quick trip to the local Home Depot to pick one up! Those of you out of range of a local Home Depot can conveniently have one shipped to you if you’re interested. The packaging was a pretty traditional ‘hard to open’ plastic clamshell that required some cutting and cajoling to get open:

After some separation of the various bits and pieces, I got a good look at the back of the thermostat which is where the radio module gets installed. This is a ‘standard’ thermostat that has two UNSAP (Utility Smart Network Access Port) radio module slots on the back of it and the WiFi module is actually a separate modular piece:

After digging into the installation directions, there were a few things of significant note: 1) There are a variety of HVAC types of systems and 2) There is no formal standard for wiring them. This means you have to be very diligent about observing the existing cabling from your current thermostat. You should turn off the breaker to your existing HVAC at this point since you’ll be plugging and unplugging live wires. After confirmation that the power to your HVAC is off, you will have to open up your existing thermostat and observe the markings on it to determine and label the wires correctly:

Use the included labels to match up the colors marked on your old thermostat. This is arguably the most intensive part of the whole project. You don’t want to get these wrong and I suggest you take pictures along the way as a reference point in case you have to call an electrician to help you out. Once you’ve labeled all of your existing cables, you can physically remove your old thermostat and begin attaching the new one. This is a matter of lining up your previously labeled cables with the connectors across the top of the unit:

It’s also worth noting that the power to the thermostat must be provided via the ‘C wire’ to power the WiFi radio. If you do not have a C wire, you will need to run a dedicated power source for the thermostat. At this point in the install, if you’re confident that you’ve got it all hooked up correctly, go ahead and install the radio module into the back of the unit. The power to the unit needs to be off to install the module so do it now, or wait until you flip the breakers and install batteries to test it, then turn it back off later to install the module. Wrap the cables across the top channel of the module and affix it to the wall using the included mounting hardware:

Once you remove the protective cover, install the batteries in the bottom of the unit and switch the power back on! You’ll have to run through a small setup to bring the thermostat online and before you move on with configuring the RF module, make sure your unit turns on your heater and AC by following the directions in the installation manual. Once you’ve confirmed it works, install the snap-in covers to hide the wires and batteries and move ahead to the fun part – the wireless setup!

The easiest way to describe the wireless setup is that the radio comes preconfigured with it’s own SSID to attach to, it’s own DHCP server, and a PIN based authentication that is displayed on your thermostat screen. Goto the Radio Thermostat site and create yourself a user account. If you have an iPhone, download the free app from the App Store. The app prompts you to log using your Radio Thermostat credentials, then prompts you to join the SSID hosted by the thermostat (wow, there’s something I never thought I’d type!). You then switch back to the Application, configure the unit to connect to your home wireless (SSID and encryption keys), then enter the PIN displayed on the thermostat to complete the setup.

Once your thermostat is online it does all of the cool things you’d expect it to – it auto updates it’s firmware, sets the time based on NTP and your timezone and then allows you to log into the Radio Thermostat page to create your heating and cooling schedules as well as perform instant changes such as setting away from home, turning on cool/heat, turning on or off the fan, etc.

In all, the installation was fairly painless and intriguing overall. Those of you interested in the wireless capabilities of the unit, it is a 2.4GHz radio that supports 802.11b/g data rates, open SSIDs, WEP, or WPA2 security. Here is what my unit looks like from a Cisco AP:

Those of you wondering, no, the unit does not support CCX. 🙂 I’d strongly advocate anyone that’s not afraid of minor electrical work, and appreciates a good overall WiFi enabled, cloud application give this a try. The effort was very doable and those of you that are afraid of cloud controlled HVAC deployments rest well knowing that the radio module is removable. The thermostat functions as a ‘regular old thermostat’ without it and you can remove it at any time.

Come visit me at No Strings Attached Show

Along with several other WLAN professionals, come visit a new community where you’ll see much more information than I can possibly post here by myself! Fear not – I’ll still share here and occasionally cross-post, but you should take a few moments and go here. Now. 🙂

-Sam

Thinking of upgrading to Cisco NCS?

Cisco recently released Cisco Prime Network Control System (NCS), an update to their Wireless Control System (WCS) NMS. This update brings with it Ciscos first attempt at integrating wireless with wired management as well as network client visibility with ISE. You’re going to want to carefully consider upgrading – since many of the new features may not be applicable to all users. Among the most highlighted features are pseudo-switch management, unified client tracking with ISE/MSE, streamlined UI, and dynamic RF heatmaps (using AP to AP RSSI values). Aside from these, NCS is basically a glorified UI laid onto of WCS. Those of you familiar with the current pain of WCS profiles, templates, and the lovely flash/java map editor will be relieved to know that all of this still exists as it is in WCS 7. Aside from the glossy front end, if you’re not using Cisco switches, ISE/MSE, or some of the refreshed reports, you’re basically getting the benefit of dynamic RF heatmaps. If you’re considering migrating from an existing WCS installation to a shiny new NCS installation, there are a few potential pitfalls that you should be aware of.

Virtualization: If you’re like many WCS users, you’re probably running WCS in a virtual 2003 or RedHat Linux server. NCS comes as an all-in-one package .OVF to load into your VMWare infrastructure. Those of you familiar with Virtual Appliances will know that this particular distribution method is intended to make distribution of Virtual Appliances easier – including all of the settings you’re going to need to setup the VM. This includes CPU allocation, RAM allocation and Hard Drive space. This is a deviation from the way you may be used to. Instead of asking your Data Center team (if you have one) to carve out a 2k3 or RedHat server, and give you remote access into it for you to complete the WCS install, you now have to give them the OVF file and ask them to run through the initial setup. To make things interesting, there are three different OVFs to choose from: small, medium and large.

Small: 2 CPUs at 2.93GHz or better, 8G of RAM, 200G Hard Disk

  • 3000 Lightweight Access Points
  • 1000 Standalone Access Points
  • 1000 Switches
  • 240 Wireless LAN Controllers

Medium: 4 CPUs at 2.93GHz or better, 12G of RAM, 300G Hard Disk

  • 7500 Lightweight Access Points
  • 2500 Standalone Access Points
  • 2500 Switches
  • 600 Wireless LAN Controllers

Large: 8 CPUs at 2.93GHz or better, 16G of RAM, 400G Hard Disk

  • 15000 Lightweight Access Points
  • 5000 Standalone Access Points
  • 5000 Switches
  • 1200 Wireless LAN Controllers

The most significant challenge you’re going to have here is that you have to select the correct sizing prior to doing your installation since there is no way to migrate from one size to another post-installation aside from backing up and reinstalling your databases.

Licensing: If you’re an upgrade customer, there is a fee you’re going to have to pay for the ability to upgrade to NCS. Once you’ve gotten upgrade fee taken care of, you migrate your existing WCS licenses to NCS. The rub here is that NCS licensing is based on the UDI of the VM as opposed to the hostname of the VM as it was in WCS. This is an install-time generated value and will be different for every VM instance. This means that if you size your VM incorrectly (as described above) and you re-install it, you’ll have to do the licensing dance to get your install up and running again. There will be a limit to the number of times you can re-issue a license so this only stresses the importance of getting your sizing done correctly upfront.

Clients: NCS does not support Internet Explorer without the addition of another plug in. We’ve been utilizing IE for managing WCS along with the Flash plug-in for years now so the addition of the Google Chrome plugin to get IE to work correctly may seem like minimally troublesome, there are numerous corporate, educational, and government users with some pretty restrictive software requirements on their PCs. If you do not have access to a PC with either the supported Firefox or IE/Chrome plugin combo, you will not be able to utilize NCS.

Switch management config: In order to ‘manage’ your switches, you’ll need to have SNMP credentials defined on all of your existing gear before you add them. Shouldn’t be a huge problem if you’ve been diligent about your deployments or if you’ve been using another NMS to do your configurations. As of now, the switch management is visibility only to the hardware and clients if you’re using an MSE. If you’re using an MSE to track wired clients, you’ll also need to enable NMSP on your switches then sync them to your MSE. While this may seem like minimal effort, this does require a fairly current version of IOS and the command:
nmsp enable
if you’re adding this along with all of your relevant Civic information data bits, this could be significant effort especially if you have a significant number of switches.

Evaluation licenses: Be very cautious about using evaluation licenses to get your NCS install up and running. When you first log into NCS, if you don’t have a valid NCS license, you cannot do anything prior to adding a valid licenses. If, during your evaluation of NCS, you have another infrastructure component running an evaluation or time expiring license, you must be cautious of your NCS license expiring at the same time as your other evaluation licenses. This will throw you into an endless loop of NCS redirecting you to the NCS license page then redirecting you back to your feature license expiring.

In all, NCS is a welcome refresh to the WCS product line, and a reasonable first stab at unifying the UI across several product lines (hence the Prime name) so go grab yourself an evaluation license from here and see it for yourself!

Resurrecting a bricked NM-AIR-WLC6

Cisco recently posted this addendum to their Software Downloads section for the Cisco Wireless LAN Controller Module:

Warning: the Wireless LAN Controller Network Module (NM-AIR-WLC6-K9) is not supported in any software release after 4.2.209.0. Attempting to install 5.0 or later software can permanently damage the module.

This is a pretty recent addition and appears to have been an oversight the past year or so while they’ve been happily releasing version after version of NMWLC code without this disclaimer. If you’re like me, you’ve been keeping up on your latest and greatest software releases and you may find yourself in some murky waters if you happen to have this module. Where I landed was a module that would boot fine, but would not establish any network connectivity (management, AP join, etc). You should note that this article in it’s entirety does not apply to the NME module, just the NM. The NME module has more memory and a 1G internal interface to the ISR, the regular old NM has less memory and only a 10/100 interface. You can tell which module you have by looking at the silkscreen on the back of the module or by doing a ‘show sysinfo’ at the CLI of the controller.

This article is not supported by Cisco, TAC, or myself. You may further damage your NM if you proceed. This article is not for the faint of heart and will most certainly void any warranty you may have. If you have a bricked NM under SmartNET, you should contact TAC for a replacement unit, not follow the directions in this post. I do not guarantee any work here and you can severely damage your module, it’s flash, or your PC. Read and follow this article at your own risk!

Now thats out of the way, the specifics of my problem landed me in a situation where I could not roll back the version of code on my flash (not having network connectivity really limits you, I gotta admit). You may find yourself with a corrupt flash, unable to boot, or other general mayhem. Once Cisco released this notification, it dawned on me that the version of code on my flash was likely the culprit. Since the NMs are basically an Pentium III with some memory and a flash to boot off (similar to the CUE or Content Engine modules) running Linux, I figured I should be able to copy the flash from a good NM and I’d be back in business. Having located a donor NM (thanks to Robert B. for his support here), I assembled  the following items to move on:

  • Donor working NM to rob/copy the flash off of
  • A small screwdriver
  • Old laptop with Cardbus/PCMCIA slot
  • CF to PCMCIA adapter (like one of these)
  • USB Flash drive larger than 256M formatted something that Linux can write to
  • A Linux distribution that I could boot off of CD like DSL
  • A static bag to work off of
Getting a donor module
The first thing I did was to remove the CF module from the donor NM.
Step 1) Place the donor NM on a static safe work place. The bag it came in would be good.
Step 2) Confirm that the module you’re working on is an NM, not an NME.
Step 3) Locate the cover that hides the flash module.
Extracting the flash
You must then remove the protective cap around the flash module.
Step 1) Unscrew the CF housing.
Step 2) Lift up gently on the right edge of the cap and it should fall off the module.
Remove the flash from the NM
Gently grasp the Cisco flash module by both edges and pull it directly out of the NM.
Insert the flash module into your CF reader.
This should be pretty straightforward.
Once you have the flash module in a CF reader, we’re going to be focused on getting a good block image off of it. The rest of this article will discuss how to take an image of the flash module and store it on a USB flash drive. Once you have your favorite LiveCD of Linux (or BSD if you prefer) downloaded, boot your old laptop off of it. We chose a LiveCD release so that we can do this on a laptop without having to do a fully blown installation of Linux just for this one project. Feel free to use any sort of Linux box you happen to have laying around. 🙂
Once you’ve successfully booted Linux, you’ll need to open a terminal window. In DSL, there is a link to the Terminal app in the bottom left corner. Attach your USB drive and insert your PCMCIA flash reader once your system is booted and your terminal is up.
Type:
sudo su


  -This puts us into super-user mode so we don’t run into any permissions issues
Then:
dmesg


  -This gives you a dump of system messages. In particular we’re looking for two things. The USB drive and the CF adapter. In my system, this looked like:
<6>hub.c: new USB device 00:1d.1-1, assigned address 3
<6>scsi2 : SCSI emulation for USB Mass Storage devices
<4>  Vendor: USB 2.0   Model: FLASH DISK        Rev: 1.0
<4>  Type:   Direct-Access                      ANSI SCSI revision: 02
<4>Attached scsi removable disk sdb at scsi2, channel 0, id 0, lun 0
<4>SCSI device sdb: 2033664 512-byte hdwr sectors (1041 MB)
<4>sdb: Write Protect is off
<6> sdb: sdb1
This tells us that our flash drive is at /dev/sdb1 (the last line above) so let’s mount it using:
mount /dev/sdb1 /mnt
Next we look for our flash reader. In my system, this looked like:
<6>cs: memory probe 0xa0000000-0xa0ffffff: excluding 0xa0000000-0xa0ffffff
<6>cs: memory probe 0x60000000-0x60ffffff: clean.
<4>hde: STI Flash 8.0.0, ATA DISK drive
<4>ide2 at 0x100-0x107,0x10e on irq 11
<4>hde: attached ide-disk driver.
<6>hde: 501760 sectors (257 MB), CHS=980/16/32
<6> hde: hde1 hde2 hde3
<6>ide_cs: hde: Vcc = 3.3, Vpp = 0.0
For this one, we’re not interested in any partition information like we were on the USB device, we’re just interested in the device name. Here, we see that this device is hde (the beginning of the third line) . Once we have both the USB drive mounted and the flash drive identified, we’re going to use dd to take a block image of the device by typing:


dd if=/dev/hde of=/mnt/sdb1/nm.image
This deconstructs like this:
  -dd is the name of the application we’re going to use to take the image.
  -if=/dev/hde tells dd that the input file is the device of /dev/hde (our CF).
  -of=/dev/sdb1/nm.image tells dd that the output file is a file on our USB drive called nm.image.


This will take some time since we’re reading the CF block by block and writing it out to the USB flash drive. The resultant image will be the same size as the CF (257M in this case) since it’s copying everything – data, unused bits, partition info, etc.
Once the read of the flash is complete, you should be back at a command prompt. You can confirm that it’s there and the right size by typing:
ls -lh /mnt/sdb1


Shutdown your laptop by using:
halt


Eject the CF adapter and re-install it into your donor NM following the instructions in reverse. Once you’ve put away your good hardware, shutdown your ISR with the bad NM, remove it out of the ISR, and extract the flash out of it as described above. Insert it into your CF reader as described above, boot your laptop as described above, insert your devices (USB and CF) into the laptop as described above, and open the terminal application as described above.


Once you’re at your terminal prompt, we’re going to do the following:
Type:
sudo su


  -This puts us into super-user mode so we don’t run into any permissions issues
Then:
dmesg


  -This gives you a dump of system messages. Look for your USB device and CF device like you did before and confirm they’re there.
Now we’re going to take our image that we created above and write it out to our bad flash:
dd if=/mnt/sdb1/nm.image of=/dev/hde


This deconstructs like this:
  -dd is the name of the application we’re going to use to take the image.
  -if=/dev/sdb1/nm.image tells dd that the input file is a file on our USB drive called nm.image.
-of=/dev/hde tells dd that the output file is the device of /dev/hde (our CF).


This will take some time as well since we’re now reconstructing all of the data bits back onto our module. Once that completes, shutdown your laptop by using:
halt


Once it’s powered off, you should have a complete copy of the flash from your donor module in your hands. Reassemble your module and re-insert it back into your ISR. Power it all back on and you should be able to use:


service-module wlan-controller 1/0 session


to confirm that your module boots successfully. One of the more obvious side effects of this is that you’ll loose your NM configuration and you’ll have your donor NMs configuration now on yours. You’ll want to watch the card boot and do a clear config first off to ensure you have a good starting point. If you don’t have a donor NM to get this process done, you may want to look around to see if anyone else in your situation has the data bits from the dd process above. Once you have an extracted image, this should work on any of the like platforms regardless of where it came from.

Cisco WLC LDPE Images

With the release of WLC code version 7.0.116.0 (otherwise known as J MR1) came a slew of new features despite the MR tag. Among those images is one that is sure to cause a significant amount of confusion – especially those that may not be familiar with the dance that is Cisco software images. That feature is Licensed Data Payload Encryption (LDPE). Data Payload Encryption allows for the data that travels between the Access Point and the WLC to be DTLS encrypted. This is normally not done. Once client data is transmitted to the Access Point, the Access Point will decrypt it (this is your traditional WEP, TKIP, AES-CCM), then tag it to the correct VLAN (if applicable) and send it on it’s unencrypted merry way! If you have a need to encrypt the data on your wire – for example, if you’re joining Access Points to your controllers across a public Internet connection, this feature is what you need. This used to be an optional (paid for) feature that was included in the WPLUS license, but this was rolled into the base WLC license and is now available free of charge on all modern WLC platforms. It should be noted that if you’re using 2000, 2100, 4000, 4400, ISR modules, or WiSM 1 platforms, these do not support encrypting your data payload and none of this article is applicable to you. 🙂

There are two different implementations of this feature – one that is an all inclusive image, one that is a separate image. Depending on the platform you’re using, you get one of those. If you are upgrading a 5500 WLC to J MR1, this is likely where you’re going to run across this for the first time which is the two image variation. On CCO, you’ll find two images:

  • AIR-CT5500-K9-7-0-116-0.aes
  • AIR-CT5500-LDPE-K9-7-0-116-0.aes

The image that requires a license to enable this feature is the second LDPE image.

Which one do you need?

The most straightforward answer to this question is that if you did not specifically purchase a 5500 with the LDPE image, you cannot install the J MR1 LDPE image onto it. This means that if you’re upgrading an existing installation, you have one choice – the ‘regular image’ AIR-CT5500-K9-7-0-116-0.aes.

The second place you’re likely going to run into this image is when you’re quoting a new controller. To decide which image you should select is going to take a bit more thought and to come up with an answer, you should probably know why the heck Cisco split this feature out to begin with. This all boils down to regulatory restrictions in Russia. So, the short version of your thought process should be, “If I’m not installing this WLC in Russia, I shouldn’t be selecting the LDPE image version”. If you are indeed selecting this version, the license itself is a $0 option, but does need to be discreetly selected.

Now, if you’re ordering a new 2504, WiSM2 or 7500 WLC, you don’t have to select a different software image, but you do need to select the $0 license if you want this feature enabled:

To wrap up, if you’ve got 5500 controllers running today, Cisco made it so you cannot install the LDPE image, so move past it when you’re doing your code upgrade. If you’re ordering new, and not in Russia, make sure your VAR/partner gets the correct DTLS license for you!

Securing your small WiFi tools

I find myself lugging around a variety of tools recently – more so than I usually do courtesy of #TechFieldDay. While I typically carry a Spectrum Analyzer, it is usually one of those ‘dedicated pockets in the laptop bag’ kind of tools that gets packed in with my trusty CB21AG survey card. Those of you keeping notes would realize that any machine purchased in the last 3 years or so is lacking a CardBus slot so we’ve been relegated to keeping our old machines around for compatibility with our trusty tools or using a clunky ExpressCard to CardBus adapter if we want to keep compatible. This works okay if your new machine sports a shiny new ExpressCard slot but those of us moving (back) to the Mac platform and not wanting to chunk out the change for a 17 inch Mac Book Pro which has the coveted ExpressCard slot but weighs a ton (not good for survey work!).

The answer? USB. Most everything has a work-alike or a preferred card that is USB so I find myself with:

Orinoco 8494 card for the AirMagnet products (Survey, and WiFi Analyzer)

MetaGeek Wi-Spy DBx with device finder antenna

AirMagnet Spectrum XT

and to round it all out, a Ralink (thanks @sevanjaniyan) based adapter for compatibility with WildPackets Omnipeek for next weeks CWAP Beta class!

The challenge: All of these things have been rolling around in my bag (in the WiSpy DBx box actually) which is a less than graceful way to treat your tools. I needed a sturdy case that could hold it all and not be so large I wouldn’t want to pack it wherever I went. Enter the Pelican 1120 case. With inside dimensions of 7.25″ x 4.75″ x 3.06″, it’s the smallest ‘small case’ they make. Being a fan of the larger 1510 case for my survey gear, and being priced (with shipping) for a modest $35, it was pretty well a done deal. Pictures of my handywork (pick and pluck style) to follow:


Hands on with the Metageek Wi-Spy DBx

MetaGeek’s Wi-Spy DBx is a small form factor spectrum analyzer which gives you visibility into the 2.4 and 5GHz spectrums allowing you to readily identify sources of interference that may be present. I was fortunate enough to spend some time with Ryan Woodings and Trent Cutler from MetaGeek while at the Wireless Tech Field day recently and they gave us the grand tour of their product lineup – hardware and software! Those of you familiar with WiFi technologies (802.11a/b/g/n) know that the frequencies they run in are unlicensed by regulatory bodies (here in the US, that means the FCC). This means that anyone can do anything there and they commonly do! People running non-WiFi devices in the 2.4 and 5GHz spaces can often cause interference for wireless networks causing poor performance, intermittent connectivity, or outright failures of wireless networks – especially in the very crowded 2.4Ghz range. Moving beyond the insight provided by such tools as inSSIDer which can only tell you about WiFi specific data, the Wi-Spy DBx allows you to visualize and identify non-wifi signals such as bluetooth devices, microwave ovens, analog video cameras, and other such obnoxious or potentially damaging signals.
MetaGeek offers a few devices and knowing what you’re looking for in what frequencies is important to selecting the right one. The Wi-Spy 900 is targeted at those looking for devices in the 900MHz range which is not useful to those of us living in the WiFi space (2.4 and 5GHz). Most readers won’t be interested in this but it’s included for completeness. The other three devices that are relevant to our WiFi space are the WiSpy 2.4i, WiSpy 2.4x and the WiSpy DBx. The two 2.4 units are fixed frequency (2.4GHz only). The 2.4i model comes with integrated antennas and the 2.4x comes with a detachable antenna (more on this feature shortly). Both of these units are appropriate for people looking at devices that only support 802.11b/g/n(2.4). The WiSpy DBx allows us to look into the same 2.4GHz spectrum as the i/x models, but also includes visibility into the 5GHz range for those of us looking at 802.11a/b/g/n across the board. With the prevalence of 802.11a devices in many ‘business grade’ laptops and with many 802.11n deices supporting the cleaner 5Ghz frequency, the DBx allows us much greater flexibility and insight into those spaces. Being a very small USB-connected device, it’s about the size of 2 AA batteries, includes an external RP-SMA connector, and a dipole antenna for instant ‘out of the box’ usability. The RP-SMA connector and antenna configuration allows you to remove the included antenna and attach an optional directional ‘device finder’ antenna. The intention here is that if you’re trying to track down an obnoxious source of interference, you can use the external panel antenna to sweep back and forth in an area to see where the signal gets stronger or weaker. Using this method, you can get much closer to ferreting out anything that avails you! 
MetaGeek offers 4 main applications for using their WiSpy devices, the main Chanalyzer application, and Lite, Pro, and Lab versions allowing for a diverse lineup for most any need. The Lite application is for the 2.4i hardware and is otherwise not a part of this review. The main Chanalyzer application is currently at version 4 and is included with the 2.4x and DBx hardware. The bundled application gives you a jumping off point for getting started with spectrum analysis and gives you the familiar ‘squiggly line’ interface as well as some pretty nice approaches to displaying data. The Max/Min and Current display views give you a one-stop glance and utilization in your spectrum for easy to digest and understand information. Chanalyzer also gives you the ability to record data for future review (or submittal back to MetaGeek!) is a feature that allows you to take a snapshot of where you’re at and review it later offline or take it to a friend that may be more fluent in spectrum analysis. With a database of silhouettes to overlay ontop of your view, you basically mix and match patterns of what is live in your environment against known or common interferes. This gives you a pretty straightforward way to identify the type of devices you’re looking for so you can narrow down if you should be hunting high for video cameras or low for microwaves.
The Chanalyzer Pro application gives you richer insight into your environment with the addition of a waterfall view along the left pane of the application. You use this to navigate through time as a running tally over the length of a capture. The addition of the new duty cycle view gives you a straightforward view of ‘consumed airspace’ and several other features such as device finding (recommend using the device finder antenna attachment for this!) as well as a very flexible report builder round out this application for those looking to ‘step up’ from the default Chanalyzer application. At $499, those looking to start offering ‘commercial grade’ reports and services to customers, this is right up your alley. As an additional incentive, MetaGeek offers a $99 savings when purchased with the DBx hardware so if you’re thinking this is where you’re going to end up, and you can stomach the extra $300, keep that in mind.
Those of you looking for the geek-out application will be interested to know that MetaGeek is also offering Chanalyzer Lab which allows you to fidget with the hardware knobs inside the analyzer hardware. This application isn’t for everyone but is indispensable for those looking for much more granularity into frequency and amplitude data. MetaGeek has made this application quite affordable at $99 so those of you looking for an environment rich in tweaking and tuning, or if you’re simply more interested in how RF works and want to dig deeper into frequency analysis, this application is compatible with the 900x, 2.4x and DBx hardware.
All three applications I tested (Chanalyzer, Pro, and Lab) required no obnoxious considerations and were very straightforward to install. There were no special drivers required on my Windows 7 VM running in Fusion on a MacBook Pro. In this configuration, the Windows OS has no direct access to the wireless card in my MacBook so I was unable to retrieve local WiFi data while using the product. Those using BootCamp to natively run Windows on your MacBook shouldn’t run into this problem but us Fusion/Parallels users are out of luck on this particular featureset until we get an OS X native version of the Chanalyzer applications. Those familiar with auto-device classification found in higher end PC based spectrum analyzers will find this particular feature missing from the Chanalyzer lineup. This ability to ‘set it and forget it’ to gather a running tally of interferes is one of the most significant features missing from an otherwise fairly complete product lineup. Given that these other analyzers typically range into the $2-3k+ range, it’s entirely plausible to find compromise for users looking for spectrum analyzers and can be flexible with their requirements.
In all, the DBx is an excellent product for the vast majority of those people looking to get data about their 2.4 and 5GHz spectrums. The flexible application approach give users the ability to make a minor investment upfront in the hardware and grow as they can justify it. While the Wi-Spy may not be appropriate for those few outstanding enterprise environments that require additional integration or those looking to automatically classify sources of interference, it is a perfect tool for those environments that don’t have newer infrastructure devices that can give them insight into their spectrum but don’t want to break the bank on some of the ‘big-boy’ analyzers. The folks at MetaGeek have done a graceful job of putting some very powerful tools well within the reach of those that are looking to jump into the wireless game or are looking to augment their personal toolkit with gear that does something that would otherwise be unavailable to them.
Full disclosure: I was a delegate for the first ever Wireless Tech Field Day event organized by Stephen Foskett and GestaltIT This event was sponsored by Meta-Geek as well as other presenters including payment of accommodations for all delegates. Evaluation product was distributed to delegates for hands-on exposure for this review. Professionally, I work for a VAR which provides services for industry leading technology manufacturers. The views expressed on this blog are my personal opinion and do not necessarily reflect opinions my employer.

Who said 5GHz was ‘clean’? :)

Here I am at home today being a good survey engineer and making sure all of my tools are in proper working order prior to going out and having to rely on them for the week when all of a sudden, I’m presented with the following anomaly when I’m exercising my trusty Spectrum Analyzer:

Those of you that are familiar with Spectrum Analysis in general usually expect to see something this bad (high duty cycle) in the 2.4GHz spectrum but not the mid-5GHz spectrum! Having just reloaded my laptop with Windows 7 and installed Service Pack 1, I was in the ‘let’s test it all’ mode to make sure nothing unexpected happens. At this point, I was pretty blindsided by the obnoxious noise happening and the ‘Generic – Fixed Frequency’ tag wasn’t helping me any. At a loss for what this could be since I live an acre away from my nearest neighbor and several miles from the nearest airport, I pinged a few of my friends. They suggested the usual suspects – MRI machine, TDWR, neighbors, etc all of which I explained away by location. Being that TDWR is in the 5470-5725 frequency, I changed my card over to 5.725 – 5.850 and after some time got this equally disturbing read:

At this point, I started to suspect my Spectrum Analyzer since I was using a non-Cisco branded Spectrum Analyzer card with the Cisco Spectrum Expert software (the card I was using had the Cognio components that Cisco purchased and re-branded as their own). So I grabbed a copy of the card manufacturers software to rule out in compatibility and I got the same results.

At the end of the day, I was able to swap in a Cisco branded SA card and my results normalized. Clearly I have a flakey (old) SA card that was giving me improper readings. Lessons learned:

  • Always test your tools and keep them in good working order
  • Don’t assume that your tools are telling you the truth. If you see something suspect, dig into it and validate against another source
Now I’m sure that I have a good card in hand I can go confidently into my week and knock this survey out of the park!